Showing posts with label Crafts. Show all posts

Thursday, August 13, 2015

4 Reasons to Host A Backyard Bible Club


Hi! Thanks for stopping by my blog!

My name is Hannah Conway, Army wife for more than a decade, and the author of The Wounded Warrior’s Wife, and Wedding a Warrior from Olivia Kimbrell Press.
This summer, our family hosted our very first Backyard Bible Club! We want to share the experience, and encourage military and civilian families to host your very own Backyard Bible Club for several reasons:
 
1: We’re promoting community, and that’s always a good thing!
 
2:  We’re cultivating relationships when we invite your neighbors over, and living in a military community it’s so vital to make connections with others we can trust, learn from and grow together. So to my military families out there, I challenge you to host a club.
 
3: The third and most important reason to host a backyard bible club is, we get to share Jesus with kids! How often do we sit in our homes and ever really get to know our neighbors, let alone work up enough nerve to tell them about Jesus or even let them know we’re a follower. A backyard Bible club helps to bridge that gap.
 
4: The 4th reason to host a club…well, that’s pretty easy! We get to have a lot of fun…a lot of messy fun…or not so messy, but our family likes messy games…really messy games! We’ve got the pics to prove it!

Thinking of starting your own Backyard Bible Club? Check out Lifeway.com for easy-to-use curriculum or use any of our ideas, lessons/agendas, crafts, games etc.
 

Feel free to comment below with suggestions for next year’s club, or suggestions/advice for anyone interested in hosting their own club.  

Scripture Blocks Made From Scrap Wood, Paint, Construction
Paper, and Modge Podge.

Friday, April 10, 2015

4 Tips for Planning a LEGO Birthday Party

Welcome, Dear Readers!
This year I've set out to get to know you better, hear your story, what God's done or doing in your life, lessons learned, trials, triumphs, recipes, and fun projects. I want to hear what you have to say, and so do a whole host of others.


Today we welcome Nicole Hines! Nicole is a mother of two, a Kindergarten teacher, and my sister-in-law! She's got some great crafty ideas, and today she's sharing some excellent tips on throwing an incredible Lego themed party!

Meet Nicole:

Hi everyone!
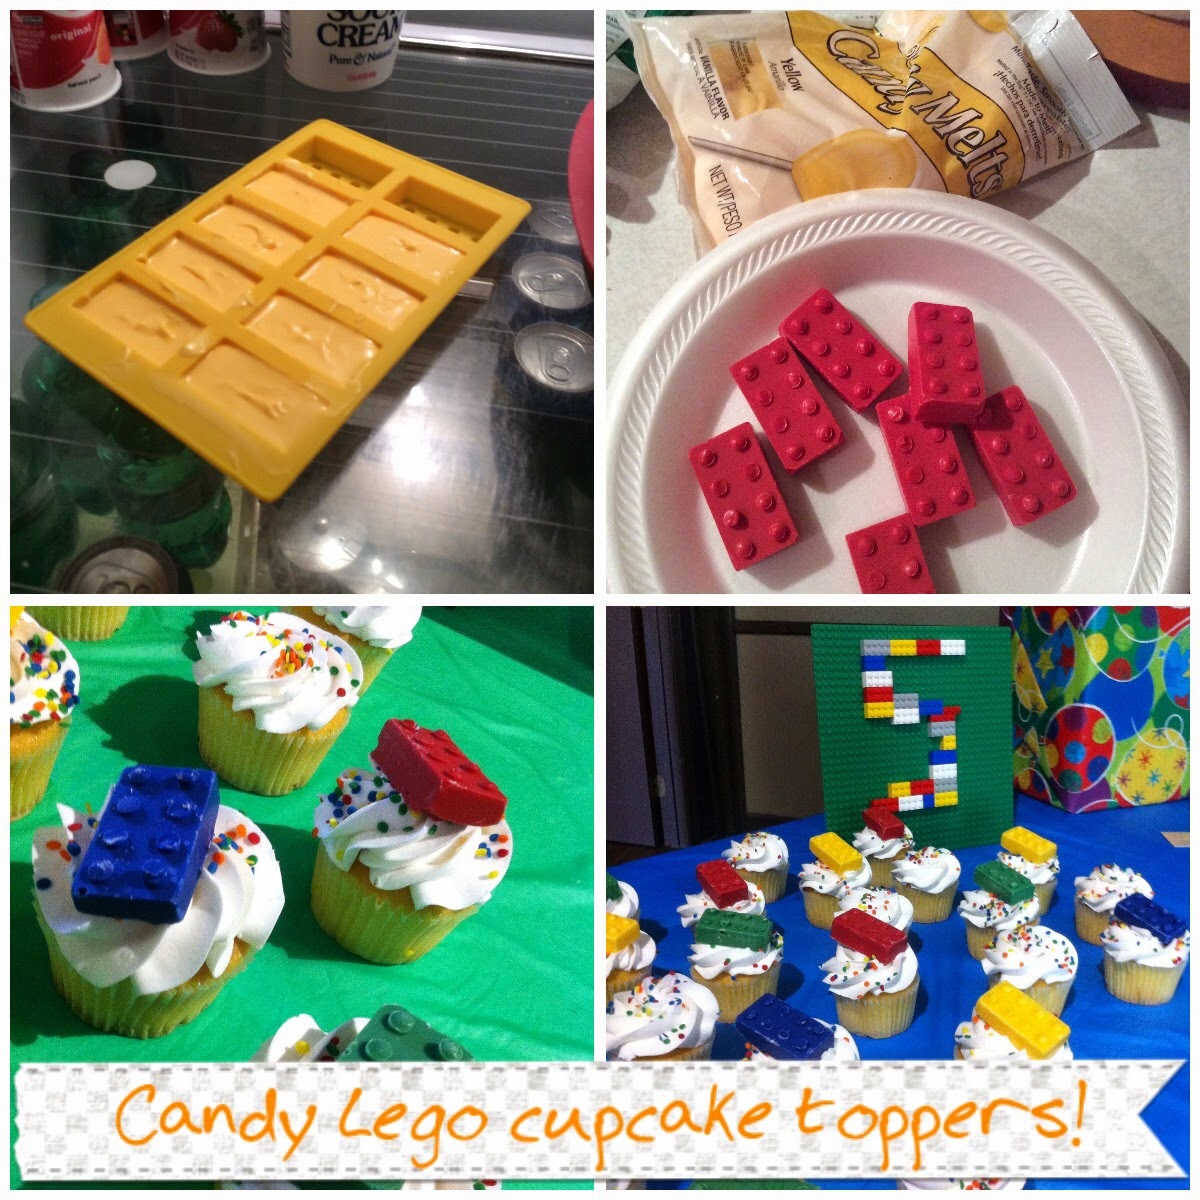
Since my boys birthdays are 3 weeks apart I decided to have a joint birthday party this year.  One thing both my boys love are LEGOs.  So I quickly decided on a LEGO themed birthday party and started surfing Pinterest for ideas. My goal was to spend as less as possible but make it look like I spent a lot. Here are 4 tips to how I got the job done!

1. Centerpieces:  I took glass mason jars and filled them with Legos.  I actually had my father-in-law cut some PVC pipe to place in the middle of the jar as a filler.  That way I didn't have to use all my Legos for the centerpieces.  I then tied balloons to the jars for some height.  Under the jars I used some Lego mats from a Lego set I already owned. Finally, I sprinkled some jumbo Legos on each table too!  I think it turned out so cute!
2.  Cake: I love cupcakes!  They are so easy for birthdays, and so good.  So I bought some Lego molds off Amazon for $8.  I bought just regular white frosted cupcakes from Kroger.  I got red, yellow, green, and blue candy chocolate from Michaels craft store, and made Lego bricks to put on the cupcakes.  I was worried that the different colored chocolates would taste gross, but I had so many compliments on how good they were.

3. Games:  A birthday party is not complete without some type of entertainment.  The space I rented for the birthday party wasn't big enough for an inflatable.  Honestly, I didn't want to blow my entire birthday budget on one bouncy house anyway.  So I had to get creative in order to keep 15 little kids entertained.  First, we played pin the head on the Lego man.  Then I used the remaining Legos, scattered them all over the hallway, and gave each child a paper bag to decorate.  When everyone was ready, we had a Lego hunt.  The goals was to pick up as many Legos as possible.  After the hunt all the kids had to try and build the tallest structure.  To say they loved it was an understatement. 


4.  Party Favors:  I used the mini figure Lego mold and made Lego crayons (I got the mold from Amazon).  The boys loved helping me peel the crayons paper off, break them into pieces, and place them in the molds. We baked them in the oven at 200 degrees, for 15 minutes. Once removed from the oven, I used a toothpick to pop the air bubbles in the melted crayons, then set the mold in the refrigerator until it cools. Afterward, I popped them out of the mold. Easy! :) Each child at the party left with 2 Lego crayons and a small little tablet. It was a hit!


Thank you for sharing Nicole!

Wednesday, December 17, 2014

Bucket of Blessings: Our Family's Christmas Advent & Devotional Time

Jesus is the Best Gift of All...


And that's why we celebrate Christmas. Love's Pure Light came to Earth to free us from our sin and give us the gift of eternal life if we choose to accept Him as our Lord and Savior. (John 3:16-17, Romans 10:9).

God gave so much--all He had, to rescue us.  What a blessing. He gave and so we give, not only at Christmastime, but all throughout the year, so each year our family participates in Bucket of Blessings to help us remember why we celebrate Christmas.

We LOVE the Bucket of Blessings and hope your family will enjoy it as well!

Bucket of Blessings

Purpose: To highlight the fact that Jesus was and is the best Gift of all, and how we are to bless others just as Christ blessed us.

Let's get started:
  • Find or purchase a bucket or box. Something small or large depending on what you'd prefer or have lying around. Feel free to decorate it with your kiddos. :)
  • Choose an Advent/Christmas devotion/Scripture reading. This year we are using the God's Gift plan from the Bible App. We've used other sources before and you can create your own devotion time using the Bible as your guide. The book of Luke Chapter 2 is where you will find the most popular version of the Christmas story.
  • Decide how many days/nights you'd like for this to last. This year we're doing 9 days only because that's how long the devotion lasts. We typically do 5-7 nights.
  • Choose a time & location to do the Bucket of Blessings with your family. For us it's after dinner sitting near the Christmas tree. For you it may be in the morning at the breakfast table.
  • Schedule Blessings for each night. Here's what we're doing this year, feel free to take these ideas or come up with your own:
    • Day 1: The Blessing of Words. I found a .99 book from GoodWill for each of my kiddos. It was my night to give them a blessing.
    • Day 2: The Blessing of Fun. We will play "The Candy Cane Game." It's basically a "Mom hides candy canes and whoever finds the most wins," game, but the kids love it.
    • Day 3: Bless Your Neighbor. We will make/sign Christmas cards and take them to our neighbors.
    • Day 4: Bless Your Brother or Sister. This night each sibling will have several minutes to talk about only the good things about their brother or sister.
    • Day 5: Bless a Stranger. This year we will be putting a few quarters in the shopping carts at Aldi's. It's fun to be someone's quarter angel!
    • Day 7: The Blessing of Grace. Grace is getting a gift we don't deserve, so this year, each kid will be able to pick one of their nightly chores for me to do for them as an act of Grace.
    • Day 8: The Blessing of Sugar. Something sweet is to be celebrated! Right!? This night Daddy will be choosing a sugary snack for each kiddo. It's his night to give a blessing!
    • Day 9: A Blessing is a Blessing just because. So on this night the kiddos will have an extension on their bedtime! Yay for them, but more prayers will be needed for us! :)
  • Begin and enjoy! I find giving the blessing after the devotion/scripture reading time is best for attention purposes.
  • Note: Gifts that are not tangible are hand written, rolled up, tied with a bow and put into the buck of blessings for the kids to pull out and read.
I'd love to hear how you've taken the Bucket of Blessings and made it your own! Have Fun!!

Friday, December 6, 2013

Chalkboard Prints: Quick Holiday Gifting

Here's a Math Problem to Puzzle the Sugar Plums Dancing in
Your Head:

Extra Blocks of Wood + (White Paint + Modge Podge) x Chalkboard Printables=???

Give up?

It equals Cute, Quick, Cost Effective Holiday Gifts! Who knew?

I've been staring at extra pieces of wood beside the shed for months wondering what in the world I would do with them. And then the idea came to me just the other day! Why not paint them white, and modge podge on one of those AWESOME Chalkboard Printables that float all over pinterest?! The kids could even join in and help create these cute little gifts for their teachers (spoiler alert if my kid's teachers are reading this).

What you'll need:
  • Blocks of Wood (I have all different sizes)
  • Modge Podge
  • 2 Sponge/Paint Brushes (one for paint, one for modge podge)
  • White Paint or any color you choose
  • Sand paper only if you need to smooth out any edges
Let's Get Started:

Step 1
Step 2: Paint, let dry


Step 3: Cut out Printable, find link below.
Step 4: Add Modge Podge to
Wood first to prevent bumps.
Learned the hard way.
Smooth on Printable.
Then Modge Podge over
sign & edges.
Step 5: Let dry, make more!


Variations of this Craft:
  • Print out the Printable and put in a frame. Simple. Easy. :)
  • Use actual chalkboard paint to paint the blocks of wood
  • I'm thinking stapling/glueing some holly, evergreen, or even a burlap bow would be a nice addition to these little chunks of wood.
Freebies:

Check out this pinterest page for FREE downloadable Christmas Chalkboard Printables. You can make your own with photoshop or picmonkey.com (free). Below is a FREE template to start with; just save picture to your computer and upload to photoshop or picmonkey to begin your own chalkboard printable: